These are plans to build a handsome pair of homemade snowshoes. I designed these snowshoes, drawing some inspiration from a pair I had made before from another design. They can doubtless be improved; see the problems below.
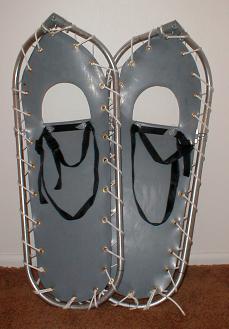
I'm sorry that there aren't more pictures here, because they would make these instructions much clearer. I didn't think about it while I was making them and I don't plan to make any more.
Please also see plans by Clint Bourgeois. He had the good idea of using roof flashing for the deck instead of Hypalon. His tutorial has good step-by-step pictures too.
See Bruce Anderson's plans for welding roofing fabric with a heat gun and a pattern for alternative bindings. Plus good pictures.
Material list:
| 2 × | 10-inch by 30-inch piece of 840-denier Hypalon |
| 2 × | 6-foot by 1/2-inch thin-wall electrical metallic tubing |
| 2 × | 1/2-inch 90° EMT pull elbow |
| 4 × | 3/4-inch two-hole EMT strap |
| 2 × | 1/16-inch by 1 1/2-inch by 12-inch flat aluminum strap |
| 8 × | 1/2-inch #10-24 machine screw |
| 8 × | #10-24 nylon lock nut |
| 4 × | #10 washer |
| 2 × | 12-foot nylon cord (parachute cord) |
| 48 × | 1/4-inch grommet |
| 4 × | 3/4-inch by 48-inch nylon strap with buckle |
A less expensive alternative to Hypalon might be PVC. (I don't mean PVC tubing, which is used in some snowshoes for the frame, but sheets of PVC that resemble Hypalon somewhat.) I haven't used PVC personally, but some people have told me it can be used in the same way as Hypalon in this project. Those people said it can be bought at river rafting shops and places that sell roofing equipment.
You'll also need a conduit bender, a hacksaw, a drill with a 3/16-inch metal bit, a pair of scissors, a heavy-duty 1/4-inch punch, a grommet-setting kit, a sewing machine with a heavy (size #18) needle, a screwdriver, and a pair of pliers.
A note on bending conduit: The conduit bender I used was marked as having 5 inches of take-up; I don't know enough to say whether using a bender with a different amount of take-up will make a substantial difference. If you don't know anything about bending conduit, as I didn't before I started this project, you should read the Bender Guide from Ideal Industries.
These plans show how to make one snowshoe. To make two, just do everything twice. The two shoes in a pair are identical except that the bindings are reversed.
Make marks on both lengths of conduit at the following distances from one end:
5, 10, 28, 35, 42, 60, 67, and 70 inchesThe perimeter of the final snowshoe will be these 70 inches, but don't cut the conduit yet. The extra length helps when bending and gives you some room for error if your bends weren't right on.
The marks you've just made mark the beginning and end of each bend you have to make. (See the note on bending above.) The mark at 35 inches is the center of the back bend; bend at 28 inches and again at 25 inches to make the bend come back around. For each of these, line up the arrow on your conduit bender with the beginning mark and bend until it looks right; the end mark is only advisory.
Each of the bends is a little less than 90 degrees. The nose bends are a little less than 90 degrees too, but they are made with the conduit rotated 45 degrees relative to the back bends. It's easy to do this, just make the nose bend first, set the conduit on the floor with your bend 45 degrees off the floor on the side, and make the next bend.
When you've finished your last bend, your mark at 70 inches should be pretty close to the other end of the conduit. Bend the snowshoe frame by hand until they line up so it looks like the pull elbow will fit, then cut off the end with the hacksaw. The extra 4 feet, 2 inches of conduit is waste.
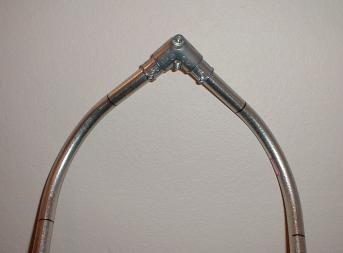
Slip the pull elbow over the ends of the conduit and tighten down the screws. Make sure the conduit goes all the way in. If it doesn't fit quite right, go back and fine-tune your bends.
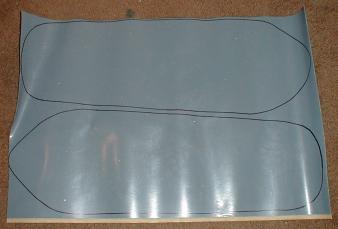
Lay your frame down on the Hypalon and trace an outline about 1/2 inch from the inside of the frame. Cut it out with a pair of heavy scissors.
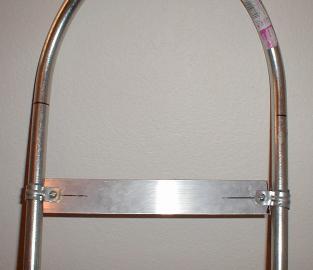
Decide where you want the crossbar to be -- this will be right under the ball of your foot. Measure the distance between the insides of the frame at that point and cut a piece of aluminum strap 1/2 inch shorter than that.
With the 3/16-inch drill bit, drill a hole centered along the width of the strap 1/4 inch from one end. Now take one EMT strap and bend it all the way around the conduit so its holes line up with the holes you just drilled. Put a machine screw through the holes and attach a nut loosely. Bend another EMT strap around the other side of the frame and mark the aluminum strap through the hole. Remove the aluminum strap and drill a hole where you marked. Reassemble the crossbar (this part can be tricky). This time put a little strip of Hypalon beween each EMT strap and the frame to prevent slipping.
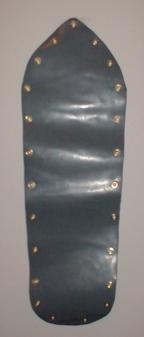
Put marks at equal intervals (about 3 inches) around the perimeter of the Hypalon. These are where the grommets will go. Make sure there's one centered at the front, and adjust the marks if necessary so they're not right on top of the crossbar.
Follow the instructions that came with the grommet kit. Hypalon is tough stuff, so you might have to get an extra punch. At this point your snowshoes should be starting to look pretty sharp.
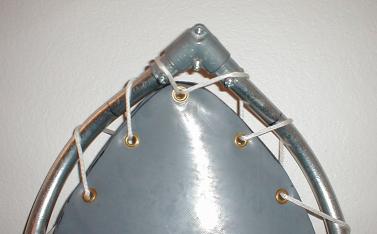
Lace the nylon cord through the grommets and around the frame, the first time very loosely. This takes a little while. Go through the grommet at the front twice, once on each side of the shoe.
Go around the shoe again, tightening the cord a little bit. Do it slowly so the Hypalon doesn't get pulled to one side. Keep going until the Hypalon is tight as a drum. Tie the cord at the back with a non-slipping knot.
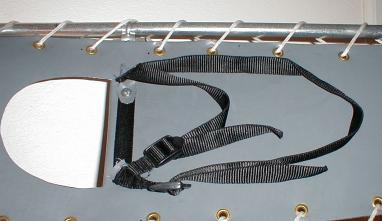
Put on the boots you plan to wear while snowshoeing. Put the snowshoe on the ground and step comfortably on the crossbar. Mark where the left and right of your boot touch on the Hypalon at the front edge of the crossbar. Also mark where the front of your boot touches. Expand these marks outwards about 1/2 inch and draw a smooth curve between them. Cut along this curve all the way back to, but no farther than, the front edge of the crossbar. Pull the resultant flap back and tape it tightly against the bottom of the snowshoe.
This is the way I made my bindings, but they're not very sturdy or secure. It might be worth trying to come up with something on your own here.
The binding for each foot is made out of two nylon straps, like the ones on sleeping bags. One is a loop that goes under and over the ball of the foot, and the other attaches to the loop and goes back around the heel. Leave enough room on the strap that's looped to attach it to the snowshoe.
Mind which way the buckles and the loose ends of the straps go; you'll be operating these with mittens on. You probably want the buckles to go on the outside of your foot, at least.
The binding will be attached with two screws that go through the crossbar. Put two marks centered along the width of the crossbar 1/2 inch in from the edges of the foot hole. Drill a hole at each of these marks right through the Hypalon, crossbar, and flap of Hypalon on the bottom. You may wish to enlarge the holes in the hypalon a little bit to allow for some movement.
Place the binding over these holes as you want it and mark the holes on the binding. Drilling through the nylon straps of the binding would fray them intolerably, so instead we'll melt holes in them. Hold a nail over a flame with a pair of pliers until it's hot, then push it through the strap.
I found while hiking that the holes in the nylon straps can stretch enough to slip over a washer and a screw. To prevent this, make two little circles of Hypalon about one inch in diameter and drill a hole though the center of each. Then put two screws through the whole assembly, with a washer and a Hypalon "washer" on the top and a washer and lock nut on the bottom. Tighten it down and you're ready to go.
One person has suggested using the top and laces of an old pair of boots for bindings.
Thanks are due to Larry and Andrew Strotheide, who provided the resources and expertise for the construction of the snowshoes on which this design is based; and to Alan Hartman, who identified a material unknown to me as Hypalon and gave me some design ideas.
These plans are not copyrighted; there is no restriction on their use, modification and redistribution for any purpose, commercial or non-commercial.
I am interested in hearing feedback about these snowshoe plans. Contact me, David Fifield, at david@bamsoftware.com.